PHOTO: G.G. Gerbing Azalea
The old tried and true Indica azalea is, for much of the South East (zone 7b, 8, and 9), especially from Birmingham to Mobile here in Alabama, a durable landscape plant that doesn’t seem to be losing much of its popularity as newly developed, heavily marketed plants find their way into the local nurseries. Indicas, with their large, showy blooms that appear in mid spring, are not only a popular natural area plant, but also finding a home as a mid sized foundation plant. Why not! They are evergreen, offer pleasant looking foliage, and if pruned properly, stay full of leaves from the ground up. Add to that the ability to grow in shade or quite sunny conditions, and you’ve got a real winner.
There are an array of Indica varieties to choose from. My experience is that some Indica azaleas, like Formosa and Pride of Mobile, are probably more suited to South Alabama than other varieties. The two Indica azaleas that I have used extensively and like the best are G.G.Gerbing (white) and George Tabor (shade of white, pink and lavender).
When laying out Indica azaleas to install, spacing is important. Decide how you want a planting to look in, say five years. A grouping of three gallon Indica Azalea, for instance, might look very satisfying with a two and a half to three foot spacing (from the center of the plant to the center of the next plant), but in five years, you will find it difficult to even walk between your plants to prune them. If a solid, hedge-like mass of azalea is what you want, and the challenge of pruning a closely spaced planting doesn’t scare you (it does me), then the decision to create a more mature looking landscape, initially, might have been worth it. 
PHOTO: George Tabor Azalea
A four and a half to five foot spacing (or even more), on the other hand, can be beneficial in a number of ways. A generous spacing will allow each azalea to grow with good air circulation. This means that the likelihood of your Indicas developing insect or disease problems is lessened. Maintaining a generously spaced grouping of azaleas will be easier, as well. While Indica azaleas can grow to well over ten feet tall and wide, keeping their size to about half of that is quite doable. With five foot or more spacing, your plants can be allowed to grow to a nice five foot tall by five foot wide size without needing drastic pruning to keep them there, and each azalea will have distinct form while the grouping, as a whole, will look full.
Of course, proper spacing is important with all plants. I can’t tell you how many times I’ve been called in to prune an over planted landscape. Some of these landscapes are less than five years old and it is nearly impossible to maintain them because of the improper spacing. There are times when the best option is to cut the plants to the ground and let them come back up as a new looking, bushy plants. This technique will then have to be repeated every few years. As an old fashioned hand pruner, to resort to that breaks my heart, but, I’m sure the landscape looked outstanding for the first couple of years.
Sunday, August 2, 2009
Spacing Indica Azaleas
Monday, July 20, 2009
A flair to remember

PHOTO ABOVE: Rudbeckia and Crocosmia together in my backyard.
Sometimes you just stumble upon a cool flower combination. I've been enjoying the mix of black eye Susan and Crocosmia over the last couple of weeks. It's always nice to have perennials blooming this time of the year, and an extra nice bonus to get a somewhat stunning combination.
Black eye Susan (Rudbeckia sp.) is a stalwart among Southern perrenials. There are several species to chose from and varieties that offer selections with different growth habits, flower color, bloom times, etc. Every Southern garden should include this plant.
Crocosmia (Crocosmia sp.), have blooms that appear on arching stems. Common Crocosmia will have orange/red blossoms, but there are hybrids available that offer a wide array of colors. Crocosmia is a fine late summer perennial and coupled with Rudbeckia, it makes for a flair to remember!
Tuesday, June 23, 2009
Compound Leaves, Poison Ivy and Aboriginies
I've had quite a few instances, while in the company of a client, when they were in somewhat of a shock as I pulled up Virginia Creepers with my bare hands. Virginia Creeper will run rampant in a garden, so pulling it out is good for your other plants. The thing is, Virginia Creeper looks a bit similar to Poison Ivy. Sort of.
Knowing just a few details, will allow you to quickly tell the difference.
In an upcoming video, your camera shy host "attempts" to show you these differences. In the process, I mistakenly say that Poison Ivy has three leaves. It has three leaflets, actually, that comprise one leaf. Virginia Creeper also has leaflets (I'm not going to tell you how many so you'll watch the video. HAHA!).
Here are a couple of examples of a simple leaves and a compound leaves:  This is a red maple leaf. It is a simple leaf. One leaf, no leaflets.
 This is a hickory leaf. It's a compound leaf. It has 9 leaflets, comprising 1 leaf.
So, on with the video. It contains a bonus section at the second half of the video. Enjoy! And remember, the white berries and hairy stems of poison ivy are also poisonous. Click here for the 3 minute video.
Wednesday, May 27, 2009
Cleaning out the picture phone...
My phone is getting old, and it's gritty because of the work I do. I've actually completely submerged this phone in water, twice, once for about 5 seconds and again for about 2 seconds. The picture quality isn't the best, but it's convenient and I see things I just want to capture from time to time. I haven't downloaded pictures from my phone since the last snow (late 2008/early 2009 ???) so I wouldn't call some of these shots particularly timely, but here goes anyway:
PHOTO: One of my favorite trees. Chinese fringe tree, scientific name, Chionanthus retusus, is a wonderful flowering small tree. Not to be confused with American fringe tree, scientific name, Chionanthus virginicus, which is native to Alabama, Chinese fringe tree offers bountiful blooms and retains a nice natural shape. There are not enough of these trees being produced by good growers, so when I see a nice specimen, I try to find a home for it.
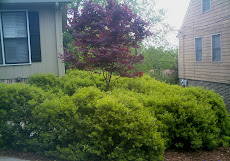
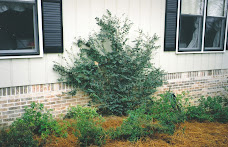
PHOTO: Simple rock border I installed for a front landscape in Greystone
PHOTOS: Weeping pussy willow

PHOTO: Snowy woods in Alabama
PHOTO: Mary praying in the snow
PHOTO: Holly berries from my yard awash in snow.
PHOTO: Extreme crepe murder! (not by my pruners, in case you wondered)
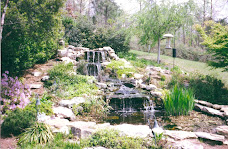
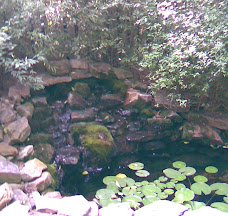
VIDEO: These are my little buddies, swirling around some food. They live in my pond that I'm building at my home...currently, still, otherwise, eternally soon to be finished...I am determined not to become the cobbler!
Sunday, May 3, 2009
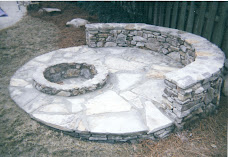
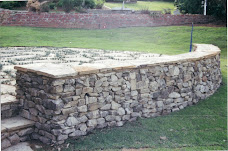
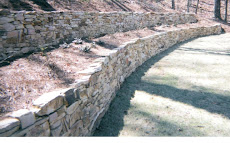
Stone in the yard
A couple of months back, I spent several weeks working for some nice folks in Vestavia. They were having a very large deck built off the back of their home and they didn't want many rails on the deck to obscure their view of the yard. In order to comply with code (a deck without railing must be within so many inches of the ground), a lot of dirt had to be brought in, but in an eye pleasing way. That's where I came in. Building a stack stone retaining wall and incorporating some large stepping stones, I was able to make the deck "legit" and find a home for some of my favorite plants, like Helaborus, Daphne odora, Aspidistra, and Osmanthus. I ended up spending a little time in other parts of the yard, as well. The video, below, focuses on the stone work.
Wednesday, March 25, 2009
Top Ten Crape Myrtle No-No's

Crape myrtles are popular in our region of the mid to lower South and rightfully so. Unlike the in vogue nature of plants such as Bradford pear and Leyland cypress, crape myrtles actually have positive ornamental characteristics that far outweigh any negatives associated with this Southern horticultural heavyweight. Among the characteristics that have many wanting at least one crape myrtle in their yard are the distinctively showy blooms, the exfoliating bark that ultimately reveal an often colorful muscular trunk, and the superb fall foliage that can range from delicate yellows to intense reds. When it comes to negatives, the crepe myrtle itself can usually be held without blame. Many times, it is the owner of the crape myrtle that has committed the no-no, and so, without delay, here is my list of the Top Ten Crape Myrtle No-No's: PHOTO: Nachez crape myrtle - possibly the most used and well-known of all crape myrtle varieties.
10. Selecting a plant that requires massive pruning to fit into it's space - Today's crape myrtle is much different than those that our parents enjoyed. We have a multitude of varieties available to us with enhanced cold tolerance, improved insect and disease resistance, and most importantly, we have crape myrtle varieties that, at maturity, grow as small as one foot tall, to giants that can reach 40' tall. With all these choices, it is upon the designer/installer to chose the appropriate plant. For instance, if you have a space where you want a white crape myrtle that grows to about 10' tall, then you should be looking for a semi-dwarf variety. Named crape myrtles usually are tagged with information that tells you how large they are going to grow or you can do a little research online and find out what varieties fit the parameters you've set up. When looking for a white crape myrtle that grows 10' tall at maturity, you don't want to buy a Nachez, for instance. Nachez crape myrtles will grow over 30' tall and will quickly become too large for your space. The better choice would be one of the white semi-dwarf crape myrtles, like Acoma.
9. Buying a plant labeled red or white or pink or purple - I've seen this from time to time. A crape myrtle simply tagged, "pink". This is a sure sign that you are probably not purchasing an improved variety and it is your guess as well as anyone else's as to how large it's going to grow. Your best bet is to steer clear and seek out a named variety.
8. Not buying a plant that is insect or disease resistant - Insect and disease has, in the past, been quite the bugaboo for crape myrtles. Aphids and powdery mildew were among the most bothersome agents of doom when it came to crape myrtle decline. Now, with improved varieties available to the public, you can pretty much purchase crape myrtles secure in the thought that they will grow well and you won't be treating them every growing season. Of course, the disclaimer is: nothing is absolute and sure as I talk about improved insect and disease resistance, there are isolated cases. Crape myrtle lists are out there that will signify certain varieties as being more hardy than others if you really want to cover all your bases. PHOTO: Tuscarora crape myrtle - Here it is used as a street tree. Tuscarora crape myrtles will grow to 20' tall by 15' wide and have huge flower panicles (12" by 8") that are dark coral pink for about 70 days during the summer. Nachez, Tuscarora, Tonto, Souix and a score of other crape myrtles are from what is referred to as the Indian series. This series of crape myrtles is readily available at reputable nurseries and are highly recommended.
7. Improper spacing - When planting a grouping of crape myrtles, attention should be paid to spacing. One characteristic of crape myrtle that can be enjoyed is the graceful branching habit. A way to diminish this characteristic is to plant too closely together and planting too closely together inhibits air circulation (which is helpful in fending off disease) and makes the landscape appear cluttered. As I've mentioned, every crape myrtle has a mature height it will grow to, but they also have a range that they will grow to in width. For example, Acoma crape myrtles are usually listed as growing to about 8' - 10' high and to about 10' - 12' wide. So, if you are planting a grouping of three Acoma crape myrtles, you probably don't want to plant them closer than 10' or 12' apart.
6. Planting in too much shade - I've seen crepe myrtles growing in too much shade and they always look unhappy (yes, I occasionally think of plants as having human emotions :-)). Now, a crape myrtle will grow nicely in just a little shade, but know that the more shade it is subjected to, the fewer number of blooms you will have, the less foliage you will have during the growing season, and the more the crape myrtle will grow leaning toward the sunlight.
5. Not keeping your crape myrtles pruned up - As you will see when you get to rule No. 1, I am not a big fan of pruning crape myrtles. I do, however, encourage limbing up and the removal of dead and intersecting branches. The limbing up process does not apply so much to the more dwarf and shrub varieties of crape myrtle and much as they do to crape myrtles that you want to look like multi-trunk or single trunk trees. The limbing up procedure is where you take smaller limbs growing out from a main trunk and prune them off flush with the main trunk. These limbs are typically going to be located on the bottom 1/3 of the plant and, when removed, give the crape myrtle more of a tree-form appearance. Also, removing dead limbs and branches that intersect, rubbing against each other, is a way to improve the overall health and attractiveness of the crape myrtle.
4. Underplanting with too much plant - I most definitely encourage underplanting crape myrtles, especially when they are planted in natural areas or as part of a foundation planting. What you want to avoid, though, is underplanting with material that overwhelms the crepe myrtle. For example, large hollies or conifers don't look good under crape myrtles. Try using low growing plant material to plant under a crape myrtle. Ground covers and other low growing plants are great to plant under crape myrtles (Asiatic jasmine, English ivy, Autumn fern, dwarf azalea, etc.).
3. Clashing colors - When it comes to crape myrtles, too much of a good thing isn't necessarily good. Typically, in my landscape designs, I may have a singular crape myrtle plant or perhaps a grouping of several crape myrtles of one variety, but rarely do I incorporate multiple crape myrtle plantings of different varieties. If you have a grouping of red crape myrtles in your yard, for instance, and you insist on going with another grouping of a different color crepe myrtle, you might avoid using purple. More importantly, I would keep in mind the colors in your landscape in relation to when and where your crape myrtle is blooming. For instance, you may not want to plant summer blooming yellow hypericum under your Souix crape myrtle unless you enjoy the interplay between a medium pink and yellow. Opinions about colors in the landscape are of a subjective nature and all I can do is offer my opinion. I lean toward what I'd call "kinder combinations" with white being the great equalizer. I prefer using different shades of pink together or white with just about any other color. I'm OK with magenta combined with pink while I try to stay away from purples with red, lavenders and pinks with yellow, etc. PHOTO: Chickasaw crape myrtle - a dwarf variety. This established plant from an Auburn University research center in about 2' tall.
2. Having a rogue crape myrtle - Seeing a planting of 4 pink crape myrtles and 1 purple one is more of a pet peeve for me than anything and it is often beyond the buyer's control. Sometimes plants simply get tagged incorrectly. With crape myrtles, when you are buying a group of one variety, take the time to examine each plant, even if they are tagged the same. You can sometimes spot a rogue plant by noticing that its habit of growth is different from the others or the leaves seem to be of different size or, if it is fall, that the fall color of one plant is different from the others. Still, if you realize that you've got a wrong colored crape myrtle....please! Replace it!!! (How's that for drama?).
1. Crape Murder - Who ever came up with that saying has given landscape professionals a catch phrase for the ages. And why not? When you top a crape myrtle, you are acknowledging that your crape myrtle was not properly selected or that you are a status quoer! (I just invented a word!!!). If you are a crape murderer, I still love you. I just don't want you within a mile of my yard if you have pruners on your body. :)
Monday, February 9, 2009
Big Stepping Stones
Stepping stones are such a fixture in many landscapes. Here's a few tips to make them work and actually add to the beauty of your little corner of the world.
1. Pick the right size stepping stone, be it real stone or man made. Consider going a little larger than you actually need, as you'll often lose some of your stepping surface if grass, soil or mulch cover some of the stone.
2. Take your time on the installation, being sure to bury the stone at a depth where water will not collect on the surface of the stone and so that a mower can roll easily across the stone if it is place in a turf situation. Also, be careful to set the stone so it doesn’t rock on you when you step on it. This is another reason to use a larger stone, as large stones are less likely to move around on you.
3. Pick out pretty stones for your project. Look at your surroundings and try to imagine how your stepping stones will blend with the rest of your yard. These stones will be around for a long time to come.
PHOTOS: I designed the layout and installed these stepping stones about three years ago in Birmingham, AL.