Tuesday, December 6, 2016

What's a landscaper to do during water restrictions and severe drought?

Hardscaping!


Well, the 3 month drought finally ended a few days ago while I was finishing up this job in Helena, AL. There were water restrictions in some places and the ground had become really hard, so the rain was exciting. Up until this week, no one has been interested in planting anything this fall. This job was a drought stricken-ed landscaper's dream....stone work!
Job - Steps, walls, grading work, prep for Spring sod work.
 

Wednesday, October 26, 2016

Secure Mail

A very nice couple in Pelham called me and asked me over to take a look at their situation. It seems that in the middle of the night a "not so cautious traveler" swerved into their mailbox which was mounted onto a fairly heavy duty metal pole. Both the pole and the mailbox were crushed.
This new stone mailbox was fun for me because I needed to try to match the stonework on the home to the mailbox. Also, I built a couple of planters
to match the mailbox. My homeowners intend to plant mums in the coming days. Hopefully, I can swing around and take a picture or two of the mailbox dressed up.


Please feel free to click on the picture for closer inspection!

Saturday, September 3, 2016

Bang for your Buck...Rip Rap Stone Bench

Stone benches like the one I completed a few days ago can cost a pretty penny when you add together the cost of the stone, cement, rebar, mortar/sand and the labor. This bench was 8' long by 12"+ deep by 17" tall,,,fairly substantial, and it didn't break the bank. I used rip rap (a limestone product quarried here in Alabama and typically used for drainage applications) for the majority of the bench. Concrete pavers (2 or 3 dollars a piece) were used for the coping (sitting surface) as another a way to achieve a desired affect for a fraction of the cost. It's not a bad way to go if you are sticking to a budget.

                                                              *click on pic for closer inspection!

Wednesday, August 10, 2016

SNAP! Transforming a Mulch Path into a Solid Stone Path


Large (and heavy) snapped slabs of brown stone, quarried near Oneonta, AL, is what I used to form my step treads for this converted mulch to stone path on Lake Martin, near Alexander City, AL. Each slab was about 40" by 14" by 3" to 4" thick, giving the overall look of the project a "solid" appeal. I decided to make the riser heights just under 6" and that made traversing the incline easy and gave the project the look I was after. In between each snap stone step are lengths of Alabama brown flagstone walkway...the width is a consistent 40", same as the step treads. Beige mortar was used in the mortar joints for continuity. Finally, moss rock was the stone of choice for what remained of the risers. The use of darker moss rock was a subtle attempt to break up the shades of brown in the step treads and flagstone.


Note: What you don't see is the hand excavation, the relentless tamping, and the ample amounts of gravel, concrete and rebar that was used under the ornamental stone to make this pathway reliable. Also, there was plenty of consideration given to where steps were placed and how to incorporate the curves and gradations along the length of the pathway.
Additional Note: It is quite interesting to watch large stone being snapped at the quarry. A large piece of stone (for instance, it could be say... 4' by 7' by 4" thick) is placed on a table with heavy duty rollers and the size being ordered is marked off. Then the stone is placed under hydraulic splitters where they are slowly lowered until the slab is broken off at the desired dimensions. It's a much better look, for certain applications, than cut stone.

Monday, July 25, 2016

Lighting Up an Old Friend

I'm lucky to have customers who have stuck with me for decades. I've been fortunate to watch their children grow up along with the plants I've installed for them. One such family lives south of Birmingham, AL. I'm not sure how long I've tinkered in their yard, but I wouldn't be surprised to learn it has been 25 years. These folks are yard people. They're plant people and outdoorsy people. Above all, they're family people. I knew enough about them to know that their back yard needed to reflect their personality. So it has a campfire area and a couple of ponds and pathways and patios. Lots of plants, as well. You'll see oak leaf hydrangea, hypericum (densiflorum),ferns, Japanese maples, ornamental grasses and much more as you wind your way around their fun and inviting backyard. This year I installed LED lighting for the back yard. Up-lighting was used on the beautiful maple trees, some puck lights were installed on the fencing and deck. Down-lighting spotlit some darker areas in the yard. And a few path lights were strategically placed to round out the job. I wouldn't have known where to start to take an adequate picture. Lucky for me, my client happens to be an accomplished, published photographer. His specialty is nature photography and he graciously spent time capturing a couple of scenes from his backyard for me to have, which I am now sharing with you. Please check out Len Holland and his awesome artistry displayed in his two books, Serendipity and Serendipity II Waiting for the Light.

Saturday, May 28, 2016

Ms. Nancy's Emerald Green Arborvitae

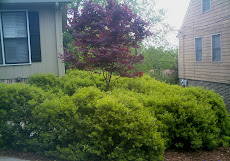
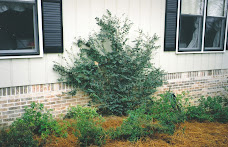
I generally shy away from linear plantings and tight pruning. It's just not my preference. The need for both was warranted in this instance. It was about 7 years ago when I met the couple who own this home in Birmingham, AL. They were looking for a planting that would screen their view of the side of the neighbor's house. Emerald Green arborvitae was the plant they wanted to use and as I looked at the site, it was obvious to me that their choice of plant was a good one. I also knew that there were cultural requirements that would have to be met in order for those plants to do well....good sunlight, drainage, proper spacing, watering, correct pruning, etc. One of the first things I checked for on this job was the condition of the soil. It was, as I suspected, poor. Really poor! Thick, gummy clay. Over half of the labor for this job was used in removing the clay for each individual hole to a depth of close to two feet and replacing it with sifted, loamy top soil. That alone was not going to correct the drainage issues. Simply removing an amount of clay and replacing it with soil would be akin to creating a bowl of water for the roots to sit in. Not only did we replace the clay, but we also went to the trouble of incorporating the good soil into the clay sitting deeper than 2'.
It was also going to be important to plant the arborvitaes shallow. It is important to plant most plants slightly shallow, but in this instance, I planted so the top of the root ball was sitting about 4" or 5" above the existing soil line. There are some nuances to consider when planting this shallow that I won't go into, but we were very careful and conscientious while doing the install. Once the planting was complete, its success was now going to be totally dependent on the maintenance. The homeowners have been great in this regard. They keep the plants properly watered, and Ms. Nancy, my plant buddy, keeps a watchful eye on all of her plants. Two or three years back, she emailed me telling me that she noticed one of the arborvitaes losing its vivid green color. I identified the problem to be spider mites and we took care of the problem in short order. The most important maintenance measure performed, especially in the last 3 or 4 years, is the pruning. I've been the exclusive pruner on these plants for their lifetime. When I prune most conifers (Emerald Green arborvitae being a conifer), I realize that they are not like other plants (broad leaf plants) in that they do not respond to heavy pruning. You have to be alert when pruning a conifer and not cut too deeply or the plant may not respond with new growth. This is somewhat of a challenge for this particular planting as we went with a fairly tight spacing (just under 3' from center to center). You can't let this planting go unpruned for too long if you are wanting each plant separated from the other or else you'd potentially be pruning on wood that wouldn't produce new growth. Prune too deeply and you might be looking at bare patches that would never fill in. Another important aspect of pruning these arborvitae is to prune so your plants (I'm really talking all woody shrubs, here) are leafy to the ground. It is common to see plants that look like lollipops or maybe they are bare at the bottom. This is because the plants are being pruned improperly. Anyway, probably way to much time spent on a type of planting I generally don't "get into", but this one is nice, largely due to the plant savy of Ms. Nancy. Hey, this planting looks so good that a lawn company used it on the front of their brochure to highlight what great work "they" do...no kidding!

Tuesday, April 5, 2016

Stack medium moss rock entrance planters w/ Ruby Slippers hydrangea

Just South of Birmingham in a quiet neighborhood just off hwy. 280, I met a very nice couple that was interested in updating the entrance to their property by incorporating stone and some new plantings. The area in question was not draining very well so it was deemed important to create a raised environment for the Ruby Slippers hydrangea and Georgia Blue Veronica we'd be installing for the project. Here are some before and afters. I'm hoping to get some additional pictures when the hydrangeas leaf out and bloom.