Saturday, December 29, 2007
Thursday, December 27, 2007
A little Red Hot Poker to warm you up!

In the midst of bare trees and cold earth, I thought I'd bring a glimpse of spring to the blog by mentioning that you can plant perennials now. Sometimes, after I've done my winter clean-up (removing drifts of leaves from my planting areas, along with other assorted winter litter, such as gum balls and pine cones), I'll find a spot for an extra special or unusual perennial. One such perennial is Red Hot Poker, or Kniphofia sp. I like Red Hot Poker because it's easy to grow and a bit unusual. This is a plant that your "upper end" nurseries are more likely to have, although, it may not be readily available until mid to late February, so you may want to call before visiting a nursery looking for it, now. There are several species of the genus Kniphofia, but the ones available for sale are going to be very similar.
Red Hot Poker plants (also called Torch Lily or Tritoma) produce spikes of brightly-colored, hanging, red-to-orange flowers. I have seen the stems that support the spikes as long as 4 to 5 feet, so keep that in mind when placing Red Hot Poker in your garden. They like full to part sun and will grow in difficult soil. The foliage is daylily-like and will develop quite a thick clump over time. No problem, though. Simply dig up the clump any time and split the clump into smaller portions. Then, you can add your new plants to other spots in the garden or give them away.
Additional Note: As with almost all commercially available plants, there are often named varieties and hybrids of the species you are considering. For instance, the Red Hot Poker plant, Kniphofia hirsute, has a variety that can be purchased via mail order (I have not seen it a local nurseries) called 'Traffic Light'. Kniphofia hirsute 'Traffic Light' has flowers that appear in the colors of a 'traffic light'…red, yellow, and green on each flower spike. Also, this variety is more compact, with spikes that stay under 2' tall.
Tuesday, December 18, 2007
Favorite ways to enjoy your fire
Universal fireplace enjoyment positions
1. Coming in from the cold outdoors - You admire the fire from a distance and then, quickly, you are drawn toward the heat. Soon, you will be standing, back to the fireplace, hands extended down, palms pointing toward and facing the fire and you’ll soon be doing the subconscious “fire dance shuffle”..
2. Quick nap - Put a log on the fire. Stretch out on the couch and gaze at fire until sleep overwhelms you.
3. Nostalgic nap - Put a log on the fire. Move any furniture that’s in the way, lay on floor, facing fire with one hand propping up head. Five minutes later, ask spouse to bring you a pillow and gaze at fire until sleep sets in.
4. Christmas fire - You are sitting on the couch with your significant other or other family member or dog or cat. The fire warms the room and off in the distance, the color wheel is moving from yellow to red to green to blue, mixing with the orange glow of the fire and the wintry smell of the Christmas tree. It all puts a really big smile on your eggnog sipping face!
Peace to all!
Sunday, December 16, 2007
Got wood?

A half cord of fire wood
Are you fortunate enough to own a fireplace? If you do, you may have wondered, “what is the best wood to burn in my fireplace?” I have always heard that you don’t burn pine (and I was surprised at what I learned) or other conifers, as well as not burning wood that isn’t dense, such as sweet gum, hackberry, or mimosa. Which woods contribute more to creosote build up? Are certain types of wood better heat providers?
I decided to do a little research and answer some questions and maybe disprove some myths. 
Me, at home on the hearth!
1. The most important thing to know about the wood you use isn’t what type of wood it is, but that it’s properly seasoned. What is properly seasoned wood? The answer is, split wood that is at least a year old and is dry.
2. How do I know the wood I’m buying is really seasoned? Truly seasoned wood is dark or gray when you compare it to green wood, but when you split it; it is white on the inside and brittle or gnarly looking.
3. Fresh (green) wood is full of moisture, which makes lighting a fire very difficult. The excess moisture in wood is what contributes the most to creosote build up in your chimney flues, because the moisture creates smoldering, which leads to having a cooler flue surface, and thus, causes the carbon particles in the flue gases to solidify and condensate (this condensation is called creosote).
4. Is pine, cedar, and other conifer wood bad for your fireplace? Actually, these soft woods are not bad for your fireplace, as long as they are well seasoned. Conifer wood will actually burn hotter and cleaner than most hardwoods, such as oak, hickory, or poplar. The downside to burning conifer wood is that they are not dense woods, so they will burn quicker, which means you are cutting and splitting a lot more wood for the same amount of heat that a hard woods will put out. Personally, I don’t think I can bring myself to burning pine or any other conifer in my fireplace, based on years of warnings from my dad and grandpa, and since there is no shortage of good hardwood, I’d stay away from pines and the like.
5. So, what are some good woods and bad woods to use in my fireplace? Good, dense hardwood to use is oak, hickory, walnut and maple. Bad woods would include hackberry, sweet gum, mimosa and white oak.
6. Manfromearth, can you give me an overview for burning wood in my fireplace? Sure. Glad you asked! Buy well seasoned wood (split, dry, and at least a year old). The wood you buy on the side of the road just might be green wood, so consider buying wood this year to burn next year! Look at the trunks of a few oak trees and maple trees, and also a sweet gum tree, before going to buy wood. You may do yourself a favor by being able to tell if the seller is trafficking good wood! Try to keep your wood dry, but don’t wrap your wood stack up in a tarp. You want air to circulate around the wood so condensation doesn’t build up, like it would under a tarp. The wood you cut and split or buy, already split, should be at least a year old and will remain burnable (if it stays dry) for up to 4 to 5 years. 
A dry stack (untarped) of split wood
Sunday, December 9, 2007
Let's Go Play in the Garden!
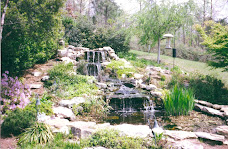
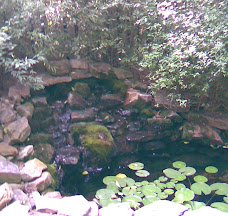
I did some hardscaping (stone steps, patio, pond and walls) this past spring for a couple that lives in Homewood. It was an exciting job for me and I was fortunate to be allowed to do some more work and help finish off the backyard landscaping this winter. Part of the enjoyment I've recieved working on this job has been the thoroughly engaging personality of this couple's son, Kyle. Kyle, age 5, has always seemed interested in what was going on in his backyard, asking questions and making suggestions. I love it! In fact, I sometimes feel like it's good to have a playful, childlike eye when deciding how a landscape might come together and maybe that's why I've enjoyed Kyle taking an interest in the landscape, so much. Well, a huge smile came over my face when I drove up to the job site and noticed that Kyle had placed hand written signs, in crayon, all over the garden. He had given each area of the yard a delightful name and I just had to share a few pictures with you. Sorry about the fuzzy photos...they don't do Kyle's art work justice.
PHOTO #1 - Stone steps leading to the garden

PHOTO #2 - Kyle's first sign, signifying the beginning of the garden

PHOTO #3 - Kyle has a sign on this red twig Japanese maple called, "Maple Garden"

PHOTO #4 - The sign attached to the stone, pointing toward the pond: "Titanic Garden"

PHOTO #5 - This is Kyle's favorite part of the garden...He calls it, "Garden Garden"

Friday, December 7, 2007
Photogenic

These fishies are very special. They know a photo opportunity when they see one! I had finished building a pond for a guy in Shelby County and he wanted me to supply the fish for the pond as a surprise for his wife who was coming in from out of town. These guys were great and they lined up perfectly for my wife, Donna, as she took this group shot.
Some of the ponds I've built over the years have gravel bottoms. It is a good look, but cleaning gravel bottoms can become a bit of a hassle as years of sediment build up. Now, I go other the pros and cons of having a gravel bottom...go over other options (including rocking the side walls of the pond but leaving the bottom without stone of any kind)...and then let the customer decide.
Sunday, December 2, 2007
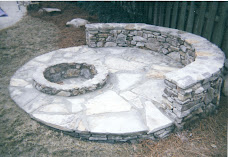
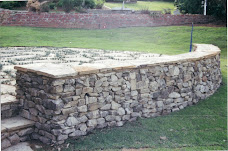
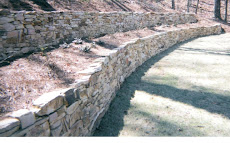
More than just a wall

This wall that I constructed in 2006 was built to provide some sense of enclosure when spending time on the patio. The wall was built wide (approx. 15") to look proportionate to the size of the patio and also to provide a seating surface. The coping material on the wall is 1" to 1.5" brown flagstone. I used moss rock for the main wall.
Wednesday, November 21, 2007
Early childhood memories
Early childhood memories about a flower, plant or tree are had by many of us. Maybe, if the memory is a particularly happy one, it is what makes us appreciate nature and eventually spark a fondness for gardening in our adult years. There is such a memory for me that is still quite vivid in my mind’s eye. I remember a sprawling tree in my grandparents front yard in Houston, Texas. It was a most inviting friend…a mimosa tree that occupied at least half of the tiny yard. My brother Joe and I would run from our parent’s car to the old tree, scurrying up its capable branches to gain a bird’s eye view of the goings on below. The smooth bark made climbing, hugging (or holding on), and sliding down the naturally made play set an easy task. There were other things about the old tree that made my memories of it even more vivid, like the puffy pink blooms and the fun seed pods that followed later in the year. And, of course, I loved my grandparents. Perhaps the sight of the stately mimosa tree as we approached my grandparents house served as a beacon, guiding us to a wonderful, loving home that we always looked forward to visiting. Do you have a plant related childhood memory?
Tuesday, November 20, 2007
Deadheading your pansies
I know it may seem a little cruel; tricking the pansy plant into thinking it’s not proliferating the species. I do this by picking off the little seed head that form after the beautiful flower fades. The pansy does more of what it thinks it needs to do, because of my thievery, to create more pansy plants. It flowers like crazy. Now, other things also help, like having good soil to grow in and proper fertilization, but deadheading is, oh so important. The pansies I have in pots on my front steps…a day doesn’t go by without me picking off at least a few spent blooms. Maybe I’m obsessed, but I have lots of flowers!
How to: Just pinch off the spent pansy bloom at the base of the stem with your fingers or use pruning snips. You’ll become an expert at determining what is a seed head and what is a flower bud in no time.
By the way - at the end of the pansy season, as spring is coming into form, I allow the pansy to go to seed. I may even scatter a few in the garden to see what might come up later in the year.
Wednesday, November 14, 2007
Yaupon Holly - Ilex vomitoria
Why am I blogging on Yaupon Holly? Could it be because I have one in my front yard? Perhaps I'm blogging on it because it is a fine evergreen plant that works as a screen or a specimen when limbed up. Don't forget that it is native to Alabama and other nearby states and has a fine show of red berries every fall through to spring! Nope....I like it's scientific name and the story behind it - Ilex vomitoria...
Yaupon (Ilex vomitoria) was a sacred shrub to American Indians throughout the Gulf Coast region, where it grows. The leaves contain caffeine and, when used in small amounts, can be made into a mildly stimulating drink. The local American Indians, however, used it in great amounts to induce vomiting (thus the scientific name, Ilex vomitoria) during their rituals. Europeans, observing these purging ceremonies, gave the plant its species name.
Wednesday, November 7, 2007
Recommended Quick Trip

There are some cool places to visit in our great state. One such place is Wilderness Park in Prattville, AL. What makes Wilderness Park especially interesting is the giant bamboo forest that you encounter as you enter the park. These bamboo reach over 60' tall and dominate the surroundings. It's a very large area of nothing but Oriental bamboo...quite surreal! Definitely bring your camera along for some interesting photo opportunities.
These photos were taken during the day. The bamboo is thick and it's rather dark once inside this forrest.
Sunday, November 4, 2007
Camellia season is here!

Camellia appreciaters everywhere are probably aware of the notion that there are two main types of this cool weather bloomer - Camellia japonica and Camellia sasanqua. While the distinction between these two types of camellia is important, there are new introductions resulting from hybridization between different species other than japonica and sasanqua. There are 80 or so species of Camellia, all of them native to areas in Asia such as Japan, Korea, and Taiwan.
In my opinion, it is wise to research which Camellia you intend on planting in your yard and chose the one that is right for you based on bloom, size, hardiness, pest resistence, etc. Here are a few of my favorite:
Camellia japonica types (typically bloom mid to late winter/early spring; often fuller, showier blooms than sasanquas):
'Debutante' - large, light pink peony-like blooms.
'Nuccio's Pearl' - Spectacular, fully double blooms with pure white petals edged with an orchid pink blush.
Camellia sasanqua types (typically bloom mid to late fall/early winter; often single petal flowering forms; usually more cold hardy than C. Japonica):
'Kanjiro' - Stunning cherise-pink semi-double blossoms edged in red with golden stamens and slight fragrance.
'Hana Jiman' - This is my favorite of all the camellias. Partly because I'm nostalgic about planting it as long ago as 1978 and partly because I love it's flowers (white w/ rose edging).
'Shishi Gashira' - Bright rose semi-double blooms are produced in abundance making this one of the top all time sasanquas. Valued for its half sized dwarf form that's more versatile in smaller spaces.
New introductions:
Camellia X 'Taylor's Perfection' - A cross between Camellia japonica and Camellia saluensis. Handsome evergreen shrub with leathery dark green foliage that backs a profusion of exquisite light pink, semi-double blossoms
Camellia X 'Debbie' - A cross between Camellia japonica and Camellia reticulata. Startling variation in flower size and form make this a unique Camellia. Rich deep rose-pink flowers in both peony and anemone form on the same plant.
Wednesday, October 31, 2007
waking up in fall
the quilt that you can’t get enough of in bed
the brisk attitude in your step when you’re finally moving about
the smile that takes over when you sneak a peak through the blinds at the outside
let’s go show em’ what we’re made of!
Sunday, October 28, 2007
Pansy Planting Tips
Hey everyone,
Here are a few pansy planting tips for you. First of all, plant pansies when it is cool, like it is now in Central Alabama. Sometimes it gets cool in early September, but I don't let that fool me. I wait until at least October and then only if it's cool. The reason for this is because pansies thrive in cool weather and do not cope well with hot weather. The pansy plants will get leggy and stretched out when they don't get the coolness they desire.
Choosing a spot is also important (just don't plant pansies in too shady of a spot). Or, I should say, preparing a spot is important. You definitely want the soil you are placing these pansies in to be nice and loamy. Have you ever watched one of those clean cut landscapers on HGTV? You know...the guy that takes his shovel in his manicured hands and sinks it into lush, to die for, soil. That's how your soil should look. The pansies will love you for it. Now, I would caution you to not make the soil "too cushy" or your plants will dry out quicker than you like.
More on soil preparation since that is likely the most important aspect of this discussion. I prefer to fertilize my pansies when I plant them. Pansies are heavy feeders (like me!), so a nice little fertilizer application mixed into the soil before planting or sprinkled around each pansy after you've planted them, will do wonders. I would suggest using a dry, granular flower food that you can get in a 4 lb. tub or a small resealable bag at the big box stores. Most flower foods will have a higher middle number (Phosphorus) and that's a good thing! For pansies, I would not use Osmocote. It is a slow release fertilizer, but it releases it's goodies based on soil temp, mostly, and in the winter time, Osmocote or other 3 month fertilizers will not be as effective. After that initial feeding, do subsequent feedings using either the same fertilizer or a liquid fertilizer with a similar fertilizer analysis (the three numbers that tell you how much nitrogen, phosphorus, and potassium are in the fertilizer). Read the label for instructions, always!
Alrighty then...the next thing to remember is: 1. always slightly loosen the roots up just before planting them in the ground...slightly loosening them is the key,,,you don't want your pansies to look like a doggie chew toy after you're done loosening the roots. 2. don't plant your pansies too deeply. They should be planted a tiny bit high with the soil mounding up to the crown of the little root ball. If this sounds confusing, just plant the plants even with the surrounding soil. I will say this, though, a slightly raised planting bed is a great idea...sorry, that comment should have been under "preparing a spot". 3. Lastly, water your little pansy friend! Water him before you plant him and water him well after you've planted him. And keep watering as he grows for you.
OK,,,sorry, but that wasn't lasty....other random notes on pansies:
A. Bigger doesn't always mean better, especially when it comes to pansies. If I'm buying a flat of cell packs, for instance, I don't look for the biggest, tallest plants. I look for nice, compact, bushy plants and preferrably plants with flower buds swelling and ready to show a burst of color.
B. Dead head your pansies (this is where I am not so much like a pansy!). Take that spent bloom and pinch it right off...this practice will encourage more blooming.
C. And really lastly, enjoy your pansies. Smell them, look at them, and thank them for being so inspiring!
Thursday, October 25, 2007
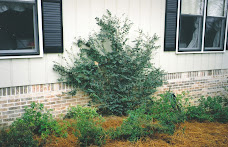
Speaking of Mahonia…

What’s not to like? Well, let’s get the negatives out of the way. The biggest complaints regarding most Mahonias (there are several species planted in landscapes) is that they have thorns and that they are leggy.
The thorns are something we can’t do anything about, except that there are some species with thorns that aren’t as prickly as others. Also, just remember that when using Mahonia, don’t plant it on either side of a narrow passage way. The legginess issue is easily rectified by pruning out older taller canes down to within six to twelve inches of the ground. The Mahonia will rejuvenate and stay bushy from bottom to top.
What’s to like? Let’s start with the course texture and exotic appeal. Mahonia has a one of a kind form and texture. It’s unmistakable! Used in a mass planting, it takes on a dominant role in your garden. What else? Mahonia is a great plant for shady areas of your yard. You know how hard it is to find plants for that particularly shady spot….why not give Mahonia a try. Mahonia will also do well in sunny spots, but the color of the leaves really stands out in shade to part shade. Lastly, don’t forget the blooms and fruit. Mahonias bloom early in the spring with clusters of yellow spikes containing tiny flowers. It’s quite showy. After the flowering, look forward to very pretty powder blue to deep dark purlple berries.
One of the lesser known positive traits of Mahonia is that it is extremely drought resistant. Plant it and water it through the first year and then you can pretty much forget about it. Along with Nandina domestica, it is a great plant to install under extra large eaves or awnings.
Species and varieties of note:
Mahonia japonica ‘Bealei’ - the most commonly planted Mahonia. Grows to 10’; maintainable at 4’-5’. Zones 5-8. This particular plant is very easy to grow.
Mahonia aquifolium - Finer texture and requires a little more sun than M. japonica. Grows to 6’; maintainable at 3’. This species is more irregular and a little harder to grow than M. japonica. Still worthy of use, especially where an oriental effect would be desired.
Mahonia fortunie - A different looking Mahonia. It has narrow, fern-like leaves and a more compact habit of growth. Very attractive and less nasty thorns. The negative is that the species here is rated zones 8 and 9. In the Birmingham area, I’d only recommend it for use in protected situations like a courtyard.
Mahonia repens - creeping Mahonia… hard to find, but an interesting choice for your garden. This plant is rated zone 8 - 5, so hardiness shouldn’t be an issue. This mahonia will only grow 1.5’ - 2’, but will spread 3’ - 4’. It needs a little sun, but not too much and makes a great large scale ground cover or a small shrub grouping. If you can find it, give it a try.
All the Mahonias I’ve mentioned have yellow flowers and are evergreen.
Click on "Mahonia" to the left to view a short video of a Mahonia.
Happy Mahonia planting!!!
Subscribe to:
Posts (Atom)