Showing posts with label project showcases. Show all posts

Friday, August 27, 2021

Flagstone patio, fire pit, steps and sitting wall, Emerald zoysia sod, and drainage. That's the not so condensed title of this post.


Here's a project I recently designed/installed in Vestavia Hills, AL -


This project objective was to create an additional outdoor space to the existing deck. The middle rail of the deck was removed to allow access to the flagstone patio area.


Elevation and drainage were given careful consideration while designing the project.


The sitting wall was installed so it could be backfilled creating a slight slope away from the patio.


This drainage basin with a heavy duty plastic grate was our fix for a substantial drainage problem. There are 2 four inch pvc pipes that handle the rain water depositing it 110 feet at the other end of the property.


The fire pit will be put to good use in the Fall and Winter months.


My brother, John, helped me with this project which included installing six pallets of Emerald zoysia sod.


90 percent of this patio was installed using a buff polymer sand. Method: The original dirt was hand tamped. Then #57 gravel was installed follow by a 1 to 2 inch layer of #8910 gravel. We followed the addition of the gravels by tamping with a plate compactor. Finally, a thin layer of sand was added which assisted in leveling the flagstone.The polymer sand was used as a substitute for a mortar grout. The product set up great.


Here are the before pictures!


Sunday, April 9, 2017

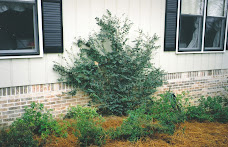
A friend and client I have worked with, off and on, recently had their grounds highlighted in Birmingham Magazine. I'm excited and honored that I am mentioned in the article.  Most of my participation in helping Julie was done close to 25 years ago. I am proud to see, however, several of the plants I installed still thriving after nearly a quarter century.  Make no mistake about it, though, Julie Cash is a creative and knowledgeable plant person. What she has done with her yard is wonderful. Here is some of the article that I was able to pull from the Birmingham Magazine Facebook page.


Gorgeous Gardens of Birmingham: Charming Cottage

Homeowner Julie Cash has been cultivating the grounds of her Homewood home for more than 26 years. "Our gardens evolve every year," says Cash, who
enjoys both the digging and design aspect of landscape arts. With some help from Rob Huckestein of Harmony Landscaping, the Cash family has turned their little plot of land into a personal haven.
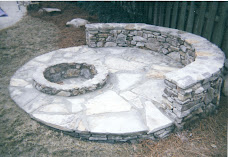
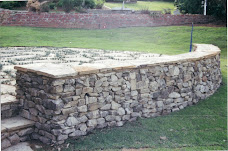
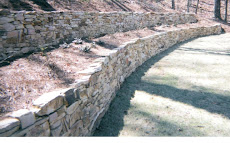
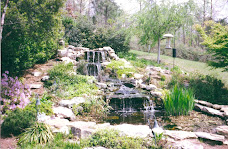
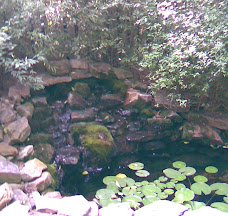
"My favorite design element is our stone wall that was built more than 10 years ago," Cash says. "The wall defines our flower beds and provides options for trailing annuals, plants of different heights, and places for us to sit and enjoy our garden and mingle with our neighbors."
Each spring and autumn, Cash selects different annuals and perennials to add to her garden. She admits her ideas are constantly changing, but she stresses the importance of having fun with the designs and trying new things. "This spring I am planting nasturtiums behind the stone wall, hoping they will drape over the wall," she says. "I planted poppy seeds last fall, too, and the babies are
growing well. By March 1, I plan to start seeds for different varieties of Black Eyed Susans, and I will plant these in a sunny spot in my backyard."
The avid gardener attributes her success to a few key practices. "Organic gardening has been a big part of the health of our garden," Cash says. She explains that she uses leaf mold and homemade compost more than any other soil amendments. Though she shops locally for most of her supplies, she acquires the majority of her seeds from Johnny's Seeds in Maine. And she also tries to stay vigilant in protecting her plantings from "the numerous wild
animals in our neighborhood who keep us entertained and frustrated."
All in all, Cash maintains that the work is well worth it. "My favorite spot is sitting on my steps, watching birds, hanging out with my dog, and drinking coffee in the morning or wine in the late summer evenings," Cash says. "But, after just a few minutes, I find a flower in need of deadheading, a weed to pull, or a flower to pick to go in one my old glass bottles."
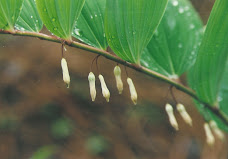
She enjoys seeing pansies, foxgloves, and snapdragons come into bloom, but she also loves the day-to-day duties of gardening. She says, "Any day when I have dirt under my fingernails is a good day!"
--By Andrea Fanning | Photos by Jean Allsopp
This story appears in Birmingham magazine's April 2017 issue. 

Saturday, May 28, 2016

Ms. Nancy's Emerald Green Arborvitae

I generally shy away from linear plantings and tight pruning. It's just not my preference. The need for both was warranted in this instance. It was about 7 years ago when I met the couple who own this home in Birmingham, AL. They were looking for a planting that would screen their view of the side of the neighbor's house. Emerald Green arborvitae was the plant they wanted to use and as I looked at the site, it was obvious to me that their choice of plant was a good one. I also knew that there were cultural requirements that would have to be met in order for those plants to do well....good sunlight, drainage, proper spacing, watering, correct pruning, etc. One of the first things I checked for on this job was the condition of the soil. It was, as I suspected, poor. Really poor! Thick, gummy clay. Over half of the labor for this job was used in removing the clay for each individual hole to a depth of close to two feet and replacing it with sifted, loamy top soil. That alone was not going to correct the drainage issues. Simply removing an amount of clay and replacing it with soil would be akin to creating a bowl of water for the roots to sit in. Not only did we replace the clay, but we also went to the trouble of incorporating the good soil into the clay sitting deeper than 2'.
It was also going to be important to plant the arborvitaes shallow. It is important to plant most plants slightly shallow, but in this instance, I planted so the top of the root ball was sitting about 4" or 5" above the existing soil line. There are some nuances to consider when planting this shallow that I won't go into, but we were very careful and conscientious while doing the install. Once the planting was complete, its success was now going to be totally dependent on the maintenance. The homeowners have been great in this regard. They keep the plants properly watered, and Ms. Nancy, my plant buddy, keeps a watchful eye on all of her plants. Two or three years back, she emailed me telling me that she noticed one of the arborvitaes losing its vivid green color. I identified the problem to be spider mites and we took care of the problem in short order. The most important maintenance measure performed, especially in the last 3 or 4 years, is the pruning. I've been the exclusive pruner on these plants for their lifetime. When I prune most conifers (Emerald Green arborvitae being a conifer), I realize that they are not like other plants (broad leaf plants) in that they do not respond to heavy pruning. You have to be alert when pruning a conifer and not cut too deeply or the plant may not respond with new growth. This is somewhat of a challenge for this particular planting as we went with a fairly tight spacing (just under 3' from center to center). You can't let this planting go unpruned for too long if you are wanting each plant separated from the other or else you'd potentially be pruning on wood that wouldn't produce new growth. Prune too deeply and you might be looking at bare patches that would never fill in. Another important aspect of pruning these arborvitae is to prune so your plants (I'm really talking all woody shrubs, here) are leafy to the ground. It is common to see plants that look like lollipops or maybe they are bare at the bottom. This is because the plants are being pruned improperly. Anyway, probably way to much time spent on a type of planting I generally don't "get into", but this one is nice, largely due to the plant savy of Ms. Nancy. Hey, this planting looks so good that a lawn company used it on the front of their brochure to highlight what great work "they" do...no kidding!

Monday, October 31, 2011

A Place to Hang : Brown stack stone wall with firepit, stone benches, and crushed ore patio.

The longer I'm in the business of landscaping, the more I'm finding homeowners that are interested in creating outdoor living spaces for family and friend to enjoy. Often times, this includes the incorporation of stone into the landscape.
My most recent project took me to a home in Birmingham, Alabama. The challange was to build a wall and patio area that turned what was a sloping wooded hillside into a space large enough to use for entertaining large gatherings, but small enough for intimate get togethers. The inclusion of a fire pit made this "outdoor room" suitable for the fall and winter, as well.
To achieve a natural look, brown stone was used for the wall and fire pit. The patio area surface is crushed red rock. The brown stone benches were delivered to the site from a local quarry. It was important that warm, curved lines were used in the design of the different components to give the project an "organic" or "old world" appeal.
 
Posted by Picasa
(click on images for closer inspection)

Sunday, October 17, 2010

A Foundation Planting that is Mindful of Erosion, Allergies, and Spacing


My most recent landscape excursion involved the installation of a front foundation planting in Hoover, AL. The home owners brought up a few concerns as we began talking about their landscape. For one, they had been battling some erosion issues at the sloping end of their home by the drive way. Also, there being issues with allergies in the family, plants for the landscape needed to be chosen to address those needs. Finally, the homeowners talked about wanting a landscape that wouldn’t become overwhelming for them. I was excited that they were aware that spacing plants too closely, while looking great initially, would eventually bring on pruning headaches and make the landscape seem like one giant hedge rather than a thoughtful gathering of distinguishable plants.

PHOTO LEFT: Son, Jake, helps his dad with stone wall installation.

A brown stone wall was installed to negate the sloping portion of the front foundation. The wall, about 4’ tall at the drive, flows into what becomes a stone border for the entire foundation planting. The wall and stone border follows lines that are curved to help include a couple of small trees and some plant depth within the planting area. Also, a small stone bench is placed on the level side of the foundation for interest and also to add a little extra “weight” to help counter the stone wall on the sloping side of the house.


Choosing plants that are relatively allergy free required a bit of research. I was aware that plants with leaves that are heavily pubescent would be more prone to trigger an allergic reaction, so that was my starting point as I developed a plant list. I also used the book, “Allergy-Free Gardening”, by Thomas Leo Ogren. Mr. Ogren uses a 1 to 10 rating system to classify a plant’s allergy potential. Every plant used in this landscape was rated 1 (best) to 5, with most being rated 3 or better. The plant list:
(from left to right as you look at the house from the street)
1. Variegated Pittosporum
2. Bloodgood Japanese maple
3. Autumn fern
4. Shi-Shi Gashira Camellia
5. Harbor Dwarf Nandina
6. Snow Indian Hawthorne
7. George Tabor Azalea
8. Tonto Crape Myrtle
9. Sherwood Abelia
10. Pansies (probably Begonias in the Spring)


Spacing of the plants in this landscape was generous. Aside from avoiding a crowded landscape in the future, a well spaced landscape also encourages good air circulation between plants which is very helpful in promoting good plant health. Another feature of this landscape was the installation of landscape cloth. Landscape cloth is similar to landscape fabric, but better. No cloth or fabric is 100 percent effective, but it can typically cut down on about 95%, or more, of your weed problems during the first 5+ years of the life of a landscape and that is when you really need that kind of weed control.

It was enjoyable working on this project...The weather was great, all aspects of the job were fun, and working for the home owners was really a pleasure.

Sunday, May 3, 2009

Stone in the yard

A couple of months back, I spent several weeks working for some nice folks in Vestavia. They were having a very large deck built off the back of their home and they didn't want many rails on the deck to obscure their view of the yard. In order to comply with code (a deck without railing must be within so many inches of the ground), a lot of dirt had to be brought in, but in an eye pleasing way. That's where I came in. Building a stack stone retaining wall and incorporating some large stepping stones, I was able to make the deck "legit" and find a home for some of my favorite plants, like Helaborus, Daphne odora, Aspidistra, and Osmanthus. I ended up spending a little time in other parts of the yard, as well. The video, below, focuses on the stone work.

Thursday, December 11, 2008

Parking Pad/Pathway Job Walk Through

The last couple of weeks or so, in between rain and cold (for Alabama), I've been in Homewood working on the installation of a parking pad, flagstone walk, and a stepping stone path.


The objective, initially was to find a spot for a car new to the family. Yes, a teenage driver (insert Bates Motel music)!!!
We decided to surface the pad with an 8910 gravel which was chosen because of the particular quarry it came from. This gravel has a slightly tan color and is not as stark as the typical gravel you buy from suppliers. Also, using 8910 gravel, which will pack down and offer an excellent surface for parking, is economical, and at the same time, attractive and functional.
The parking pad was bordered, on the lawn side, with a stone soldier course. Those stone, most of which are exposed 3 inches above the grass line, have nine plus inches buried and surrounded with cement and mortar. Careful attention was used in selecting the soldier course stone so that, one, the colors matched with the walkway, and two, that the length and thickness of the stone fell in place with the over all scale of the entire project.
The flagstone walkway was installed using a combination of stepping stones that were previously used for traffic from the drive to the front door and from stones the homeowner had left over from previous work on the house. Using the two different types of stone actually made for an interesting combination that worked well together.
The stepping stone path was chosen to provide access from the pad to the front door. As usual, I tried to steer away from straight lines, trying to make the pathway seem more "organic".

PHOTO: Crimson Queen Japanese maple

Finally, a planting bed was created at the head of the parking pad to help direct foot traffic and help soften the over all project. The homeowner has already bought a 'Crimson Queen' Japanese Maple to plant in the bed. It should really enhance the entire job.p

Friday, October 10, 2008

Transform a ho-hum bed into something more

Have you ever noticed how a flower bed can start to lose its appeal? Grass and weeds begin to creep in and take up residence with the plants. Some of the plants just aren't performing as well as they could. Oh, woe is the gardener that confronts such a situation with little time and even less money (the DOW was down again) to do something about it.

Recently, I encountered just such a situation at a very nice couple's home in Homewood. The bed on the back side of their home was divided into two or three sections. Some of the beds had loosely arranged rock borders, where the rock was basically sitting on top of the ground, and other beds had no rock border or delineation at all. Bermuda grass, the scurge of flower lovers, had found its way into much of the garden space, as well.
The recipe to upgrade this garden didn't take much time or expense.


The formula for this situation:
1. With a can of spray paint, I played around with some curved lines for the bed outline, letting some of the plants that were already planted dictate how far out from the brick the beds would extend.
2. Once the outline was determined, weeds and Bermuda grass were sprayed.
3. Using the stone that was already there and adding a little bit more (from my own personal pile!), the border was installed. Nothing fancy, here. Much of the stone was dug up over the last couple of years, right there on the property. Tip: When installing a stone border, try standing the stone on edge, buried a few inches and then tamped in, to get more mileage out of your resources.
4. After installing the border, a soil mix was added to the bed. A few plants were raised so not to be planted too deeply and ferns, hosta, peonies, and few other fun flora were divided and replanted (dividing plants, a great way to take up garden space).
5. Where appropriate, landscape fabric was installed to keep weed re-emergence to a minimum. And finally, mulch was applied.


To make this little project work, three things were essential.
1. A design that the client was happy with.
2. Proper installation techniques (in the case of this project, that would be plants and stone).
3. Maintenance (don't let weeds go unattended, mostly).
These three components are the keys to any successful landscape project. DESIGN, INSTALLATION and MAINTENANCE.

Wednesday, August 6, 2008

Circular patio with fire pit and sitting wall

Me and my trusty pick-up found our way to Trussville, recently. I met a very nice family there that was interested in having a round patio with a firepit and sitting wall. They explained to me that the round shape of a patio would contribute a calming effect to those who used it. I have to admit, I do feel a calm pass over me when I sit on that patio, now that it is completed. The line of a circle is so simple, yet beautiful, you know. It's no wonder it can bring about serenity and convergence.

VIDEO: Circle Patio

Friday, April 4, 2008

Mortar-less rock wall

Last November, I constructed a rock wall for some very nice folks in Homewood. They were initially considering a wall made from one of those segmental retaining wall systems....like Keystone, Geostone, etc. One advantage of using those is that they are, genreally, easy to erect and they need no mortar. The material is not cheap (relative to other materials), though, and the look is, how should I say,,,not very organic. I convinced my clients to give natural stone a try and they have told me they are happy they made the choice.

Constructing a mortar-less stone wall that is over 3 or 4 feet tall requires some careful considerations. For one, the amount of loose backfill to be placed behind the wall plays into the size of the stone chosen. By the way, we decided to use a brown rubble stack stone for this project. Most of the stone I used for this wall was three to six inches thick by ten to eighteen inches long by eight to twelve inches deep (some deeper for extra security). Sidenote: When I call my stone provider, I like to throw them a loop and ask for stone that is the size of something off the wall, such as a brief case or a toaster or a mail box. I usually get an uncomfortable pause (no telling what they're thinking!), so I always give them some actual measurements, too.


The basics of wall building come into play and must be adhered to, also. They include preparation of a foundation, including several inches of gravel base; backfilling with gravel; baffling the stone as the wall is being built. Other things, such as parallel placement of the stone, securing the top of the wall with substantial stone pieces, and creating pleasing lines when designing the wall are important.

Finally, the finished product achieved my clients objectives. It helped to create a level area for their son to play on and it added positively to the overall appearance of their backyard.
ps...You can click on any picture that is included as part of one of my posts to get a larger view.

Friday, March 14, 2008

Job Walk Through

Recently, I undertook a project in Dadeville, AL. My clients wanted me to convert an existing rock patio into a more appealing and usable patio area. The design I presented included a kidney shaped patio, a 15'+ moss rock sitting wall w/ flagstone coping, and a fire pit (raised and also with moss rock and flag coping). We also decided to rebuild/enlarge an existing small pond and water course that is within just a few feet of the patio. You are welcomed to take a tour of this job with me, if you like. Here we go!


This is a before picture. The existing patio was there long before my clients bought the house and, as you can see, it was very uneven and practically unusable.


The first thing I did was bringing a mini-excavator to the job. That machine helped pull out all the stones from the old patio, as well as digging a foundation for the sitting wall/fire pit and leveling the patio area. The blue tarp was my way of working even when it was raining.


Once the mini-excavator work was done, it was good ol' pick, shovel and rake time to complete the fine grading. I had to start work on the sitting wall and the fire pit before getting involved with the patio construction, as well.

With the sitting wall and fire pit in progress, I installed a crush and run gravel base for the patio, which I compacted with a plate compacter.


This is the stone patio with out grouting....Using the stone from the old patio presented some challenges because a lot of the stone was not very flat and the thickness of the stone varied from 1 inch to 5 inches.


More stone patio installation before grouting....The reason for using the stone that was already there as opposed to simply getting new flagstone was that, despite the difficulties I've already described, this stone was very pretty stone.


Here's a shot of the project nearly done. The sitting wall w/flagstone coping is completed and the fire pit is also done. Just a little bit more grout work before the patio project is complete.


I encountered all kinds of weather while working on this job. Did I mention it snowed down there?


The finished product!


Here is the pond redo. I pulled up all the rocks and replaced the liner of the old pond, and then redesigned, installed and enlarged. You can left click on the any of the pictures on the right side of my blog to get a closer look.


View from a room!

Thursday, January 10, 2008

Stone and Brick can work together.


Here is a picture of a job I did out near Vandiver about two years ago. It's a containment wall of stone with a flagstone coping, plus steps and a flagstone walkway. The client I was working with is an excellant gardener and uses stone extensively throughout her planting areas. My stone work, which was needed to make the parking area workable at the front of the house, acts as a "bridge" connecting the beautiful brick work of the home to the stone she has used with her plantings. The combination, I think, is pleasing and adds interest to the overall appeal of this fantastic homesite.


Parking Pad w/ steps and flagstone walk leading to front door


Awesome gardening by the homeowner!