Saturday, December 29, 2007
Thursday, December 27, 2007
A little Red Hot Poker to warm you up!

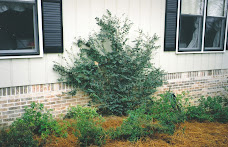
In the midst of bare trees and cold earth, I thought I'd bring a glimpse of spring to the blog by mentioning that you can plant perennials now. Sometimes, after I've done my winter clean-up (removing drifts of leaves from my planting areas, along with other assorted winter litter, such as gum balls and pine cones), I'll find a spot for an extra special or unusual perennial. One such perennial is Red Hot Poker, or Kniphofia sp. I like Red Hot Poker because it's easy to grow and a bit unusual. This is a plant that your "upper end" nurseries are more likely to have, although, it may not be readily available until mid to late February, so you may want to call before visiting a nursery looking for it, now. There are several species of the genus Kniphofia, but the ones available for sale are going to be very similar.
Red Hot Poker plants (also called Torch Lily or Tritoma) produce spikes of brightly-colored, hanging, red-to-orange flowers. I have seen the stems that support the spikes as long as 4 to 5 feet, so keep that in mind when placing Red Hot Poker in your garden. They like full to part sun and will grow in difficult soil. The foliage is daylily-like and will develop quite a thick clump over time. No problem, though. Simply dig up the clump any time and split the clump into smaller portions. Then, you can add your new plants to other spots in the garden or give them away.
Additional Note: As with almost all commercially available plants, there are often named varieties and hybrids of the species you are considering. For instance, the Red Hot Poker plant, Kniphofia hirsute, has a variety that can be purchased via mail order (I have not seen it a local nurseries) called 'Traffic Light'. Kniphofia hirsute 'Traffic Light' has flowers that appear in the colors of a 'traffic light'…red, yellow, and green on each flower spike. Also, this variety is more compact, with spikes that stay under 2' tall.
Tuesday, December 18, 2007
Favorite ways to enjoy your fire
Universal fireplace enjoyment positions
1. Coming in from the cold outdoors - You admire the fire from a distance and then, quickly, you are drawn toward the heat. Soon, you will be standing, back to the fireplace, hands extended down, palms pointing toward and facing the fire and you’ll soon be doing the subconscious “fire dance shuffle”..
2. Quick nap - Put a log on the fire. Stretch out on the couch and gaze at fire until sleep overwhelms you.
3. Nostalgic nap - Put a log on the fire. Move any furniture that’s in the way, lay on floor, facing fire with one hand propping up head. Five minutes later, ask spouse to bring you a pillow and gaze at fire until sleep sets in.
4. Christmas fire - You are sitting on the couch with your significant other or other family member or dog or cat. The fire warms the room and off in the distance, the color wheel is moving from yellow to red to green to blue, mixing with the orange glow of the fire and the wintry smell of the Christmas tree. It all puts a really big smile on your eggnog sipping face!
Peace to all!
Sunday, December 16, 2007
Got wood?

A half cord of fire wood
Are you fortunate enough to own a fireplace? If you do, you may have wondered, “what is the best wood to burn in my fireplace?” I have always heard that you don’t burn pine (and I was surprised at what I learned) or other conifers, as well as not burning wood that isn’t dense, such as sweet gum, hackberry, or mimosa. Which woods contribute more to creosote build up? Are certain types of wood better heat providers?
I decided to do a little research and answer some questions and maybe disprove some myths. 
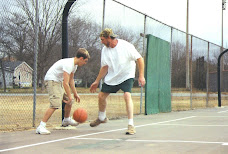
Me, at home on the hearth!
1. The most important thing to know about the wood you use isn’t what type of wood it is, but that it’s properly seasoned. What is properly seasoned wood? The answer is, split wood that is at least a year old and is dry.
2. How do I know the wood I’m buying is really seasoned? Truly seasoned wood is dark or gray when you compare it to green wood, but when you split it; it is white on the inside and brittle or gnarly looking.
3. Fresh (green) wood is full of moisture, which makes lighting a fire very difficult. The excess moisture in wood is what contributes the most to creosote build up in your chimney flues, because the moisture creates smoldering, which leads to having a cooler flue surface, and thus, causes the carbon particles in the flue gases to solidify and condensate (this condensation is called creosote).
4. Is pine, cedar, and other conifer wood bad for your fireplace? Actually, these soft woods are not bad for your fireplace, as long as they are well seasoned. Conifer wood will actually burn hotter and cleaner than most hardwoods, such as oak, hickory, or poplar. The downside to burning conifer wood is that they are not dense woods, so they will burn quicker, which means you are cutting and splitting a lot more wood for the same amount of heat that a hard woods will put out. Personally, I don’t think I can bring myself to burning pine or any other conifer in my fireplace, based on years of warnings from my dad and grandpa, and since there is no shortage of good hardwood, I’d stay away from pines and the like.
5. So, what are some good woods and bad woods to use in my fireplace? Good, dense hardwood to use is oak, hickory, walnut and maple. Bad woods would include hackberry, sweet gum, mimosa and white oak.
6. Manfromearth, can you give me an overview for burning wood in my fireplace? Sure. Glad you asked! Buy well seasoned wood (split, dry, and at least a year old). The wood you buy on the side of the road just might be green wood, so consider buying wood this year to burn next year! Look at the trunks of a few oak trees and maple trees, and also a sweet gum tree, before going to buy wood. You may do yourself a favor by being able to tell if the seller is trafficking good wood! Try to keep your wood dry, but don’t wrap your wood stack up in a tarp. You want air to circulate around the wood so condensation doesn’t build up, like it would under a tarp. The wood you cut and split or buy, already split, should be at least a year old and will remain burnable (if it stays dry) for up to 4 to 5 years. 
A dry stack (untarped) of split wood
Sunday, December 9, 2007
Let's Go Play in the Garden!
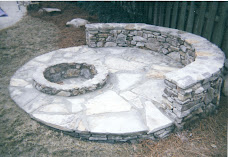
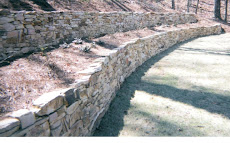
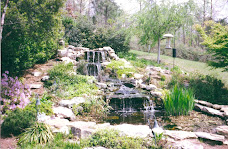
I did some hardscaping (stone steps, patio, pond and walls) this past spring for a couple that lives in Homewood. It was an exciting job for me and I was fortunate to be allowed to do some more work and help finish off the backyard landscaping this winter. Part of the enjoyment I've recieved working on this job has been the thoroughly engaging personality of this couple's son, Kyle. Kyle, age 5, has always seemed interested in what was going on in his backyard, asking questions and making suggestions. I love it! In fact, I sometimes feel like it's good to have a playful, childlike eye when deciding how a landscape might come together and maybe that's why I've enjoyed Kyle taking an interest in the landscape, so much. Well, a huge smile came over my face when I drove up to the job site and noticed that Kyle had placed hand written signs, in crayon, all over the garden. He had given each area of the yard a delightful name and I just had to share a few pictures with you. Sorry about the fuzzy photos...they don't do Kyle's art work justice.
PHOTO #1 - Stone steps leading to the garden

PHOTO #2 - Kyle's first sign, signifying the beginning of the garden

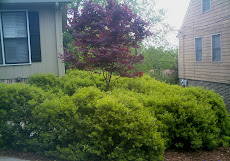
PHOTO #3 - Kyle has a sign on this red twig Japanese maple called, "Maple Garden"

PHOTO #4 - The sign attached to the stone, pointing toward the pond: "Titanic Garden"

PHOTO #5 - This is Kyle's favorite part of the garden...He calls it, "Garden Garden"

Friday, December 7, 2007
Photogenic

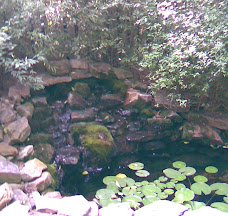
These fishies are very special. They know a photo opportunity when they see one! I had finished building a pond for a guy in Shelby County and he wanted me to supply the fish for the pond as a surprise for his wife who was coming in from out of town. These guys were great and they lined up perfectly for my wife, Donna, as she took this group shot.
Some of the ponds I've built over the years have gravel bottoms. It is a good look, but cleaning gravel bottoms can become a bit of a hassle as years of sediment build up. Now, I go other the pros and cons of having a gravel bottom...go over other options (including rocking the side walls of the pond but leaving the bottom without stone of any kind)...and then let the customer decide.
Sunday, December 2, 2007
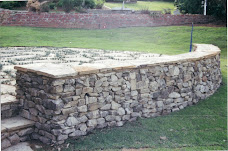
More than just a wall

This wall that I constructed in 2006 was built to provide some sense of enclosure when spending time on the patio. The wall was built wide (approx. 15") to look proportionate to the size of the patio and also to provide a seating surface. The coping material on the wall is 1" to 1.5" brown flagstone. I used moss rock for the main wall.
Subscribe to:
Posts (Atom)