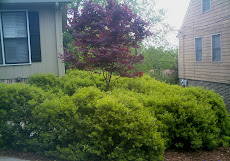
I generally shy away from linear plantings and tight pruning. It's just not my preference. The need for both was warranted in this instance. It was about 7 years ago when I met the couple who own this home in Birmingham, AL. They were looking for a planting that would screen their view of the side of the neighbor's house. Emerald Green arborvitae was the plant they wanted to use and as I looked at the site, it was obvious to me that their choice of plant was a good one. I also knew that there were cultural requirements that would have to be met in order for those plants to do well....good sunlight, drainage, proper spacing, watering, correct pruning, etc. One of the first things I checked for on this job was the condition of the soil. It was, as I suspected, poor. Really poor! Thick, gummy clay. Over half of the labor for this job was used in removing the clay for each individual hole to a depth of close to two feet and replacing it with sifted, loamy top soil. That alone was not going to correct the drainage issues. Simply removing an amount of clay and replacing it with soil would be akin to creating a bowl of water for the roots to sit in. Not only did we replace the clay, but we also went to the trouble of incorporating the good soil into the clay sitting deeper than 2'.

It was also going to be important to plant the arborvitaes shallow. It is important to plant most plants slightly shallow, but in this instance, I planted so the top of the root ball was sitting about 4" or 5" above the existing soil line. There are some nuances to consider when planting this shallow that I won't go into, but we were very careful and conscientious while doing the install. Once the planting was complete, its success was now going to be totally dependent on the maintenance. The homeowners have been great in this regard. They keep the plants properly watered, and Ms. Nancy, my plant buddy, keeps a watchful eye on all of her plants. Two or three years back, she emailed me telling me that she noticed one of the arborvitaes losing its vivid green color. I identified the problem to be spider mites and we took care of the problem in short order. The most important maintenance measure performed, especially in the last 3 or 4 years, is the pruning. I've been the exclusive pruner on these plants for their lifetime. When I prune most conifers (Emerald Green arborvitae being a conifer), I realize that they are not like other plants (broad leaf plants) in that they do not respond to heavy pruning. You have to be alert when pruning a conifer and not cut too deeply or the plant may not respond with new growth. This is somewhat of a challenge for this particular planting as we went with a fairly tight spacing (just under 3' from center to center). You can't let this planting go unpruned for too long if you are wanting each plant separated from the other or else you'd potentially be pruning on wood that wouldn't produce new growth. Prune too deeply and you might be looking at bare patches that would never fill in. Another important aspect of pruning these arborvitae is to prune so your plants (I'm really talking all woody shrubs, here) are leafy to the ground. It is common to see plants that look like lollipops or maybe they are bare at the bottom. This is because the plants are being pruned improperly. Anyway, probably way to much time spent on a type of planting I generally don't "get into", but this one is nice, largely due to the plant savy of Ms. Nancy. Hey, this planting looks so good that a lawn company used it on the front of their brochure to highlight what great work "they" do...no kidding!